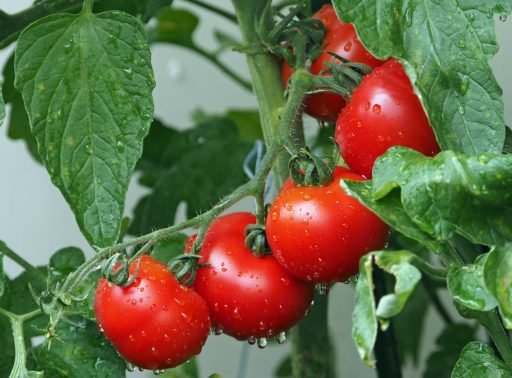
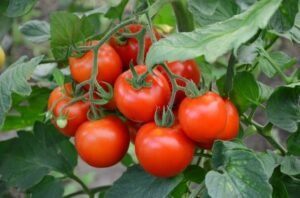
How to Grow Tomato Step-By-Step To Get Better Harvest

If you have an interest in learning how to grow tomatoes commercially, indoors, in pots or containers, then read this tomato farming guide till the end.
This guide on how to grow tomatoes covers everything starting from planting tomato seeds through to harvesting.
Tomatoes are very productive and have many uses in the kitchen and you can as well eat them fresh off the vine.
It is a very popular vegetable all over the world which people use in making different types of dishes including stews, soups, salads, burgers, jollof rice, etc.
They are also used in the production of tomato paste, puree, ketchup, tomato juice, and lots of other dishes and sauces.
The interesting fact about tomatoes is that it is easy to grow, requiring little or no expertise at all.
All you need is the basic techniques for growing tomatoes and you will become successful in tomato farming
This guide covers all the information you need to grow tomatoes successfully—including;
- Selecting the best tomato varieties
- Preparing the seeds
- Transplanting tomatoes outside
- Staking the tomato vines
- Finally, tips on how to care for the tomato plant.
You can as well use the table of content in this article to navigate your way through this tomato farming guide.
Read Also;
- Poultry Farm Equipment: All You Need to Start Poultry Farming
- 15 Awful Reasons Why Your Chickens Are Not Laying Eggs Yet And Solution
- What Can You Feed Chickens to Make Them Lay Eggs?
- What is a Pullet chicken?
- How to Make The Best Organic Chicken Feed For Your Farm
What are the basic necessities for starting a tomato farm?
To start your tomato farm, here are the basic things that must be in place;
- Firstly, you need viable tomato seeds. There are many varieties of tomato and we’ll discuss some of them later in this article.
- You must also have a nursery for sprouting the tomato seeds
- Then, you need fertile land for transplanting the tomato plants
- Finally, you must have disease and pest prevention control measures
Tomato farming guide: How to grow tomatoes step by step
Growing tomatoes is not difficult at all you need to ensure that certain conditions are in place to support the growth of the plant.
You must ensure that the time of planting is right and that you are using the right variety of tomato seeds.
Following these precautions will guarantee success in your tomato farming business and ensure great yields.
There are lots of conversations within each of the steps in this tomato farming guide.
So, you must take your time to read between the lines to get all the information you need for a profitable tomato farming business.
Without further ado, let’s get right into this tomato farming guide.
Step 1: Prepare the tomato nursery

The very first step of the tomato farming process is to prepare the nursery for sprouting the tomato seeds.
Most farmers may choose to prepare their tomato nursery on raised beds in their garden, however, you can start your seeds indoors.
So, whether you have a greenhouse or a sunny window ledge, that will suffice for making the tomato nursery.
Once the seeds start sprouting and have a few leaves and an established root system, you can then transplant them to an area that provides room for growth and tomato production.
How to prepare tomato nursery
While starting seeds indoors may be optional with many vegetables, it is very important in tomato farming.
That’s because tomato seeds need a constant soil temperature of at least 60oF, and preferably 80oF, to germinate.
Tomatoes originate deep in the tropics, as a result, any temperature below 32 degrees Fahrenheit will kill them.
If you have a garden or a small space in your backyard, you can also use it to start your tomato nursery.
This can be done around March/April when the rain is just starting in most parts of the country
Although, with the change in climate, you need to check with any farming calendar to find the best time every year for growing tomatoes.
If you don’t have a small piece of land for the tomato nursery another option is to use pots or containers.
Using pots or containers to grow tomato seeds may require you to get a soilless potting mix or seeding mix.
A soilless potting mix is a standard homemade soilless mix containing equal amounts of peat moss, perlite (and/or vermiculite), and sand.
In the absence of sand, wood bark replaces sand while coconut coir replaces peat moss.
This medium is great for sowing tomato seeds, though you can opt for the more expensive ‘seeding mix’ if you want.
If you are using containers, make use of the tiny plastic pots grouped together in packs often used for flower and veggie seedlings to start the tomato seeds.
However, a better idea is to use a small pot at least 3 or 4 inches tall and wide so the seedlings can grow to a healthy size without their roots being constricted.
How to use the potting mix for tomato nursery farm
The steps for using the potting mix for a tomato nursery include the following
- The first step is to fill the pots with potting mix leaving a space of about 1/2-inch at the top of each pot.
- The next step is to place a pair of tomato seeds on top of the soil, each one near the center of the pot. Having two seedlings provides insurance in case one doesn’t sprout. In a situation where they both sprout, pinch off the smaller or weaker of the two plants.
- After placing the tomato seeds in all the pots, cover them with about ¼-inch layers of soil mix, and then compress the soil with your fingers. Compressing the soil with your fingers creates good seed-to-soil contact which is important for germination.
- Continually sprinkle water on the seeds whenever the top of the soil mix appears dry. Make sure you don’t waterlog the pots so that the seeds do not rot. To make it easy to spray water on the seeds, use a hand sprayer.
Temperature conditions for growing tomato seeds in the nursery
Tomatoes are heat-loving and sun-seeking plants just like okra and watermelon plants.
These warm-season plants do not tolerate extremely cold weather or frost at all.
As a result, you must be careful of the time of planting the tomato seeds.
In most regions, the soil is not warm enough until April or May, but it depends on where you live.
Normally, the seeds will need at least 4 hours of direct sun each day, but preferably more.
You can place the pots by your window or even on your balcony to receive direct sunlight.
This is because the warmer the temperature, the faster tomato seeds will germinate.
Maintaining room temperature above 60ºF will get the job done.
In about 5-7 days the tomato seeds will start germinating.
Types of tomato varieties for profitable tomato farming
There are many tomato varieties that you may choose from and they vary according to size.
The choice also depends on how you want to use this versatile fruit in the kitchen.
For example, Roma tomatoes are not very good when you eat them fresh but are great for making sauces and ketchup.
Generally, you can categorize tomato varieties based on how they grow.
In this case, they are of two types;
- Determinate tomatoes: These are tomato plants that grow to predetermined heights. They produce tomatoes that are good choices for canning and sauce-making.
- Indeterminate tomatoes: This type of tomato increase in height throughout the growing season because the terminal of the stem continues to produce foliar growth rather than set flowers. This type of tomato plant will continually produce fruits throughout the season along with the side shoots of the plant. Indeterminate tomatoes are the choice if you want to spread out the harvest over a longer period of time.
Setting the growth habit of tomatoes aside, here are the different types of tomatoes.
1. Cherry tomatoes
Examples of cherry tomatoes include Sun Gold, Napa Grape, and Pear Drops.
They are a very sweet tomato variety which you can eat fresh and are great for salads.
Because they produce small tomato fruits, these tomatoes species mature quicker
2. Sauce tomatoes.
Types of sauce tomatoes include Roma, Amish Paste, and Big Mama.
These ones have a richer flavor and much lower water content than other varieties.
They’re the best tomato types for making spaghetti sauce.
Sauce tomatoes, especially Roma, is the most popular tomato species in Nigeria Markets.
Roma species are very unique because they have a long shelf life.
This is because they have thick skins and are in low water content which enables it to last longer after harvest
3. Beefsteak tomatoes
Typical examples of beefsteak tomatoes include Mortgage Lifter, Cherokee Purple and Brandywine.
They have the biggest fruit and the greatest range of flavor and form.
This is the type that you normally slice for sandwiches or making Caprese salad, though you can eat the best varieties like an apple.
Read Also;
- Tomato Companion Planting [The Best and the Worst Plants for Tomatoes]
- Food and Health – A list of good and Healthy Foods for our Health
- Ginger Farming: How to Grow Ginger Step by Step
- Watermelon Companion Planting [The Best and the Worst Plants for Watermelon]
- Surprisingly Healthy Fruits
Step 2: Transplant the tomato plants to the farm

After preparing your tomato seedlings in the nursery, now it is time to transplant them outdoors.
But one problem that you may have is that the conditions outside the nursery are harsh.
Everything from the desiccating winds, to the heat of the sun, and armies of bugs and diseases can destroy your young tomato plants.
To prevent this from happening, there are two things you must do before going about transplanting the tomato seedlings outdoors.
The first thing to do is what farmers call “hardening off” while the other one is “land preparation.”
Hardening off tomato seedlings
The term “hardening off” tomato seedlings describe the gradual introduction of the seedlings to the outdoors.
This should typically happen over a 10-day period.
The essence of this process is to acclimate the tomato seedlings to outdoor conditions.
It is a gradual process and will require plenty of patience and hand-holding.
Here are the steps to follow for hardening off tomato seedlings;
- You need a place with shelter outside where the seedlings can sit in filtered sunlight and out of the wind. One option is to string a shade cloth overhead and on the side the wind blows from.
- The next step is to take your tomato seedlings outside and leave them in this shelter for a few hours on the first day.
- After day one, bring back the tomato seedlings inside.
- On day two, leave them outdoors for a little longer than the previous day.
- Continue taking them back and forth each day, leaving them out a little longer each time and slowly increasing their sun exposure by taking them out of the shade gradually.
- After five or six days of going back and forth, leave the seedlings out overnight for the remaining four or five days. While doing this, keep an eye on the weather and bring them in if there is any danger of heavy rain or frost.
Site selection and soil preparation for tomato farming
When it comes to site selection for tomatoes farming, select a site with full sun.
This is because the warmer the soil is the faster the tomatoes will grow.
So, ensure that your tomato farm receives at least 6 hours of daily sunlight.
As for the suitable soil type for growing tomatoes, tomatoes will grow in many different soil types.
However, the soil needs to be well-drained and not waterlogged.
Waterlogging will prevent the soil from warming up quickly, especially in the rainy season, and then affect tomato growth.
In addition, ensure that the soil for growing the tomatoes is slightly acidic with a pH of 6.2 to 6.8.
While you are still hardening off the tomato plants, you can as well start preparing the soil from day one.
Here’s how to prepare the soil for growing tomatoes;
- Loosen the soil to a depth of at least 8 inches. How you loosen the soil will depend on the size of the tomato farm. You can use a digging fork or a rototiller for a small garden while a large tomato farm will need a tractor.
- While tilling, incorporate and thoroughly mix compost into the soil.
- After that, create a low mound with the loose soil. The mound should be about 4 feet wide.
- If you are going to use a drip irrigation system, now is the time to lay the drip tapes.
- Finally, it’s time to transplant the tomato seedlings.
How to transplant tomato seedlings
After selecting the best site and completing the land preparation process, transplant the tomato seedlings to the land.
Ensure that the seedlings are mature enough for transplanting.
You will know that your tomatoes are ready for transplanting into the garden when the seedlings are 3 to 4 inches tall.
Also, ensure that the nighttime temperatures are consistently above 50 degrees.
With all of these in check, here’s how to transplant tomato seedlings to the garden.
- Dig a hole in the middle of your tomato bed that is at least a few inches deeper than the depth of the pot the seedlings are in. If you are using a drip irrigation system, make sure the hole is close to the water nipple. As for the spacing, check the seed package for the recommended spacing between tomato seedlings for each variety you are planting. Spacing is based on the mature size of the plant and may range from 30 to 60 inches. Avoid overcrowding the tomato plant stands as this will lead to the spread of diseases.
- The next step is to remove each seedling from its container and loosen the roots very gently.
- After that, plant the seedlings deep and leave only the topmost leaves above the ground. This technique helps the tomatoes to improve drought tolerance, root establishment and wind resistance.
- Finally, press the soil firmly around the seedlings with your hands and then give them their first watering.
Tips for growing tomatoes successfully
While growing tomatoes may be very easy to do, many things can go wrong in the short life of a tomato plant.
To prevent them from happening, take a few extra steps to give your seedlings the best chance for success.
The following tips will help you to become successful in tomato farming;
1. Ensure that the soil condition for planting tomatoes is slightly acidic.
The ideal pH for growing tomatoes is between 6 and 6.8.
To be sure of the soil pH level, you can test your soil pH with a kit available at most farming centers/local extension services.
If the soil is too acidic soil then you can adjust it by adding lime.
On the other hand, you can amend alkaline soil by adding sulfur to lower the pH.
Note that it will take a few months for the pH of the soil to adjust.
Because of that, ensure that you do these amendments months before planting time.
2. Avoid planting tomatoes on the sand piece of land every year.
This is common practice with most other crops.
Soil-borne pathogens and diseases remain in the soil after harvesting the tomatoes.
Therefore, planting on the same land piece if the land will expose the plant to these pathogens
As a result, you will experience losses and the low yield on your tomato farm.
The best way to prevent this from happening is by planting on a different portion of land every year.
3. Keep the soil warm by covering it with a black plastic
After preparing beds for tomatoes, covering the soil with black plastic for a few weeks prior to planting is one way to get it warm.
Besides getting it warm, the plastic traps enough heat to kill insect larvae and diseases in the soil.
In cool climates with a short growing season, you can leave the plastic for the first few weeks after planting, putting the seedlings in the ground via a small slit.
The black plastic sheet will absorb the heat of the sun and transfer it to the soil.
As a result, it helps to maintain temperatures above 60⁰F which the tomato plants love.
4. Use a healthy dressing of compost at planting time for the tomatoes
While it is important to incorporate compost into the soil during land preparation, it is also necessary to dress the tomato plant with a healthy amount of compost.
Also, adding some fertilizer ensures the plants get off to a strong start.
One method of adding fertilizer is by digging a trench down the middle of the bed.
The trench should be a couple of inches below the depth where the roots will be planted.
Once the digging is completed, spread a band of fertilizer for the tomatoes to grow into.
For the purpose of root establishment, use a bone meal-based fertilizer, which is high in phosphorus.
A few weeks after planting, apply a fertilizer with a higher nitrogen content on the surface of the beds to support lush vegetative growth.
5. Water your tomato seedlings
In a situation where heat is too much and water evaporates easily, you may need to water tomatoes daily.
Water the tomatoes whenever the soil dries out an inch or two below the surface.
After three or four weeks of growth, mulch the beds with a thick layer of straw to conserve moisture and keep the weeds down.
Step 3: Stake, train and prune the tomato plants

When tomato starts spreading its vines, the beds can be very messy, ugly, and disease-ridden if proper care is not taken.
To prevent your tomato farm from devolving into a sorry state, you need to care for and support it.
One way of achieving this is by supporting your tomato stems with a trellis, stake, or cage.
You can train the tomato plant to grow on this equipment while you primp and prune their vines into a respectable form.
If you do this, the plants will be healthier, more productive, and more presentable.
How you put trellise on the plant will depend on the type of tomatoes.
Recall in step one where we talked about types of tomatoes, we mentioned determinate and indeterminate tomato types.
When you pick up the seed packet of your tomatoes, you will find the “determinate” or “indeterminate” labeling on it.
This labeling is important at this stage because it helps you to determine how you will stake your tomatoes.
Determinate labeling means that the plant will grow to a certain, genetically determined size and then stop growing.
The packet should indicate the size.
On the other hand, the indeterminate tomatoes will grow indefinitely, as long as extreme temperatures or other acts of nature (or humans) don’t stop it.
Types of staking for growing tomatoes
Remember I just mentioned that the type of tomatoes you are growing will determine the type of staking you will use.
Now, here are the different types of staking you can use in tomato farming.
1. Wire tomato cages in the shape of a downward-tapering cylinder.
This type is fine for small, bushy determinate varieties.
However, it will quickly become overwhelmed by a large indeterminate plant.
2. Single stakes
A single, stout stake is an effective support structure for a tomato plant.
For small determinate varieties, use a 1-inch-by-1-inch-by-4-foot stake and pound it into the ground at least 6 or 8 inches deep near the base of the plant.
For large tomato vines, use a 2-inch-by-2-inch-by-7-foot stake and pound it in at least 14 to 16 inches.
When selecting wood for staking, avoid pressure-treated lumber.
Such types of wood may leach toxic chemicals into the ground around your tomato plants.
3. Trellises
You can set up a simple trellis to use for a single growing season to stake your tomatoes.
Setting up will require you to pound in a row of stakes along the center of your tomato bed.
After that, run horizontal lengths of twine between them so that the tomatoes inside can climb.
For small tomato varieties, use 1-inch by 1-inch by 4-foot stakes spaced every 4 to 6 feet and run the twine across every 6 inches.
In the case of larger varieties, use 2-inch-by-2-inch-by-7-foot stakes spaced every 6 to 8 feet and run the twine across every 12 inches.
Pruning and training tomatoes for proper growth
Staking your tomato farm is one thing to do, another thing is to train the plants to climb.
Training tomatoes is simple, you have to start when they’re young, about a month after transplanting.
The training requires you to tie the stems of your tomato plants to the support structure every 6 or 8 inches as they grow.
The growing stems are soft and can damage easily, so you need to tie them loosely.
Materials for tying the plant include a thick garden twine, plastic plant tape, strips of fabric or old pantyhose.
How to stake tomato plants
When tying the tomatoes, make sure you tie just above a cluster of flowers rather than just below.
Otherwise, the stems holding the flowers may get crimped by the ties as the flowers turn into heavy clusters of fruit.
Also, if you’re using the single-stake method or the single-string trellis method, make sure you train the tomato plants to a single stem.
As for the horizontal-string trellis method or the cage method, three or four stems work best.
It’s best to decide on a method of staking before planting the tomatoes seedlings in the garden.
This is so that you can space the plants much closer together if they will be trained to a single stem, versus those with multiple stems, which need to branch out over a larger area.
As the original stem grows, it will begin to sprout side stems—often called ‘suckers’—in the crotches between the leaves and the main stem.
When you start noticing these side stems, it is time to prune out all the tomato suckers.
Pruning helps you to maintain a single stem and reduce the burden on the tomatoes when it starts fruiting.
If the tomato has multiple stems, then let the first few suckers that appear grow into stems of their own and prune out subsequent suckers.
To prune, simply snap off the sucker with your fingers or cut with a pruning shear just above the point where it joins the main stem.
Step 4: Take care of the tomato plants to prevent diseases
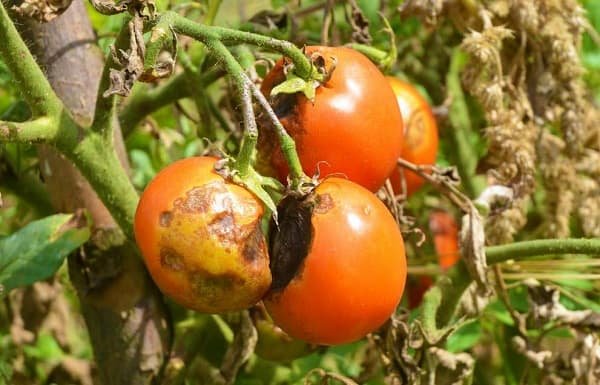
You need to take very good care of your tomatoes because the crop is very susceptible to pests and diseases.
Keeping your plants healthy goes a long way in helping prevent disease.
A good way to avoid problems is by choosing disease-resistant tomato cultivars whenever possible.
Also, note that tomato plants will be more susceptible to soil-borne disease and rot.
As a result, you need to get them off the ground with a stake or other support system.
Training and trellising help maintain airflow and keep the fruit off the ground where the disease spores hide.
How to care for tomato crop
In order to properly care for the tomatoes, here are a few things you can do.
1. Minimize frequent irrigation of your tomato farm
Tomato plants have surprisingly low water needs and overwatering can promote diseases.
Once the fruit has started to form, water only when the top three inches of soil becomes dry and the leaves look limp in the heat of the day.
2. Water the tomato crop at ground level
Little can be done about water that falls from the sky, but don’t add insult to injury by showering your tomatoes with a sprinkler.
Irrigating your tomato farm with a sprinkler will only increase the spread of fungal diseases that thrive when the plants are wet.
Instead, use drip irrigation or a soaker hose to apply water directly to the roots of the plant.
3. Water the tomatoes plants in the morning
By watering in the morning, you allow the moisture to evaporate quickly from the surface of the soil.
This will provide the roots the water they need, but keep the humidity down around the plants.
4. Use straw or dried leaves to mulch your tomatoes
Mulching helps by covering the fungal spores in the soil.
It also helps to conserve moisture in the soil, so you don’t have to water as much.
5. Remove disease infected leaves from the tomatoes farm immediately
When you notice any spots or deformation on the leaves of the tomato plants, don’t hesitate to clip them off.
Doing this early may save the rest of the plant from succumbing to the disease.
After clipping the affected leaves, dispose of them far away from your tomato plants.
6. Prune out dense foliage from the tomato stem
Tomatoes tend to grow more thickly than is necessary, reducing airflow and producing more foliage than their immune systems can support.
To reduce this, prune out new sprouts that emerge from the main stems.
Do this once the fruit has begun to develop and then train the plants to an open, spreading form.
7. Weed out all vegetation and make sure every other crop is low
Ideally, tomatoes should be planted out in the open with nothing but mulch, turfgrass, or other small stature crops (like basil or garlic) around them.
That’s because tomatoes need a lot of airflows to grow effectively.
A thicket of weeds or a tall patch of corn or beans next to your tomatoes blocks airflow and keeps the humidity high at ground level.
8. Disinfect all tools used in the tomato farm
Maintain proper hygiene by disinfecting every tool you use on the farm.
After pruning diseased tomato plants or after working on the soil around them, you should disinfect the tools before using them on or around healthy tomato plants.
Also, be careful not to repeat the same tools on plants in the tomato family, such as peppers, potatoes, and eggplant.
To disinfect your pruning shears, dip the tools in a 10 percent bleach solution or full-strength rubbing alcohol.
9. Control insect pests from affecting the tomatoes
It is rare for tomatoes to be destroyed by insects, but they are frequently attacked on a small scale.
These attacks weaken the plants and make them more susceptible to disease.
Typically, some of these insects are also vectors that are responsible for spreading diseases.
To disperse small sucking insects like scale, aphids, and mites, spray an all-natural insecticidal soap on the plant.
As for larger bugs like hornworms and stink bugs, you can pick them off by hand.
Always, check the stems and both sides of the leaves if you see signs of insect damage.
Follow the signs with immediate remedial actions if necessary.
10. Fertilize the tomato crop
Tomatoes are heavy feeders and will have greater disease resistance with a few boosts of fertilizer during the growing season.
Once the fruit has been set, apply a high phosphorus fertilizer every three weeks.
Tomato diseases and how to control them
Controlling tomato diseases will require you to be proactive and apply preventive measures.
That is because you cannot stop most tomato diseases after they affect the crop.
Even though there are fungicides and bactericides that can help combat these diseases, they are only truly effective when you apply them as preventive measures.
For organic farmers, there are products such as copper sulfate, which are naturally derived but are still highly toxic.
This type of product is only allowed to be used in extreme cases.
In such a case, the organic farmers must report that no other measures have been effective and that they are in danger of significant economic losses if the disease were to progress.
Some homemade remedies for controlling tomato diseases range from the use of hydrogen peroxide and baking soda sprays to applying a slurry of skim milk or just feeding the plants chamomile tea.
While there may be merit to some of these approaches, waging war with tomato diseases is rarely a winning battle, making prevention techniques the best cure.
Step 5: Harvest and sell the tomato fruits
Tomatoes do not take so long before they reach maturity.
At least two months after transplanting the tomato seedlings, the fruit should be filled out and starting to turn color, and ready for harvesting.
When the tomato fruits become ready for harvest, cut them off with scissors or hand pruners and allow a short stub of stem attached.
Doing this will prevent the area around the scar at the top of the fruits from rotting before you have a chance to eat them.
Contrary to popular belief, tomatoes ripen just as well off the vine as long as when you pick them in a ‘mature green’ state.
At the mature green state, it means that the seeds inside the fruit are fully developed.
Green tomatoes may be picked once they’ve reached their maximum size and have begun to show the first blush of color on their skin.
Reasons to harvest tomatoes fruits before their color change on the stem
There are several circumstances where picking a tomato before it is fully colored makes sense.
Here are some of them;
1. Harvest before tomato fruit color changes helps to prevent premature cracking
Some varieties of tomatoes, especially heirloom varieties, are prone to cracking around the crown of the fruit.
This usually leads to premature rotting.
Therefore, picking them before they crack avoids the problem altogether.
2. Bring tomatoes inside in their mature green state help them to ripen fully
Tomatoes will not color up when temperatures are consistently above 86 degrees and will rot on the vine in the green state.
However, bringing them indoors allows them to ripen fully.
3. It helps to minimize the spread of fungal diseases
Cool rainy weather exacerbates the fungal diseases that tomatoes are so prone to.
If the fruit begins to rot as it colors up, then bring plants in when green.
How to make tomatoes ripen faster
After harvesting your tomatoes in their mature green state, how then can you make them ripen faster?
There are several reasons why tomatoes should not ripen on the step, however, they do not need to be in a sunny window in order to ripen.
In fact, they ripen much faster when you place them in an enclosed space since they emit ethylene gas as they ripen.
The greater the concentration of ethylene gas around the tomato fruits, the faster and more fully they will ripen.
You can ripen tomatoes indoors by using a cupboard, or paper bag, or placing them between sheets of newspaper.
As the tomatoes ripen, they need oxygen, so don’t seal them up in a plastic bag or Tupperware.
And above all, don’t put them in the refrigerator as they will not ripen at temperatures below 65.
If all conditions are right, it will take approximately two weeks for green tomatoes to ripen indoors.
To speed up the process, put a ripe banana or cut-open apple in a bag with the green tomatoes.
Both fruits emit lots of ethylene gas which will hasten the process of ripening of the tomatoes.
Once tomatoes have fully ripened, you can store them for up to four weeks at 55 degrees before they start to decay.
They may last even longer in the refrigerator, but they turn bland and mealy when kept below 50 degrees.
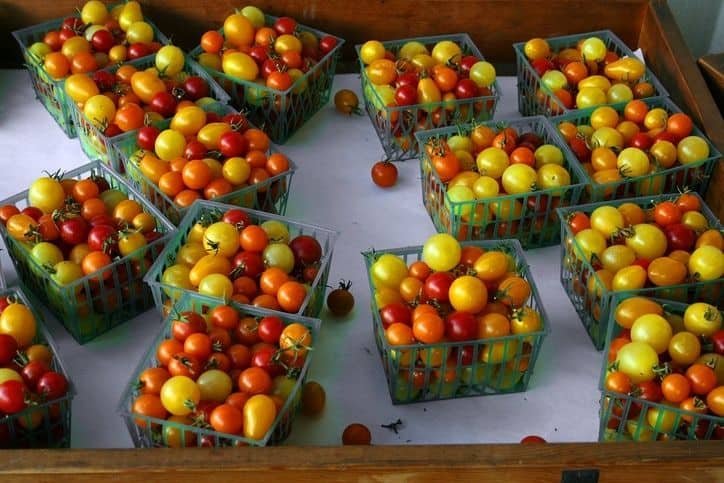
Marketing and selling your tomatoes fruits for profit
Because of the nature of tomatoes, it is important to prepare your marketing well ahead of harvesting.
Look for who or where to supply the product.
This is because tomato is a perishable product unless you have built a storage or processing system to avoid food waste.
If you own a big farm, it is best to sell your tomato fruits in bulk to malls or processing plants.
You can also go to markets and supply wholesale prices to retailers.
The standard units for selling tomatoes are in baskets, so you may want to get many of those to sell the tomatoes.
How long does it take tomatoes to grow?
How much time it takes for tomatoes to grow to maturity will depend on the variety of the tomato.
For instance, you can plant a quick-growing tomato such as the 4th of July Tomato, and you’ll be eating your first ripe tomato in as little as 49 days after transplanting.
However, the number of days to maturity of tomatoes ranges anywhere from 60 days to more than 80 days.
Because of the relatively long period of time, it takes for tomatoes to grow, most farmers grow them by transplanting rather than planting the seeds directly into the garden.
It’s also common to purchase transplants in garden nurseries which you can plant in your garden.
When picking tomato transplants, look for short, stocky plants with dark green color and straight, sturdy stems about the size of a pencil or thicker.
Try not to pick plants with yellowing leaves, spots, or stress damage.
Also, avoid plants with flowers or fruits already in progress.
Summary of the tomato farming guide
Tomatoes are a profitable crop to grow, however, you need proper guidance to succeed.
As it our norm on this agriculture blog, we always advice farmers to get first hand training from the nearest farmer.
This is so important because you can avoid a lot of mistakes by allowing an expert in tomato farming to guide you.
With proper guidance and the right farming methods, I so sure you are well on your way to making millions in tomato farming.
If you find this article helpful, please share using the social media icons on your screen or at the bottom of this article.
Your comments, contributions and questions to this tomato farming guide are welcomed.
Cheers!!
References;
- 10 Pro Tips on How to Take Care of Succulents

- 6 Uses For IBC Totes On The Farm

- Revolutionizing African Agriculture: The Potential of Bokashi Composting

- Cucumber Farming: How to Plant, Grow, and Harvest Cucumbers
- Okra Cultivation Guide – The Step-By-Step Okra Farming Procedure

- Cucumber Companion Planting [The best and the worst crop to grow with cucumber]
- How to Grow Tomato Step-By-Step To Get Better Harvest
- How to Grow Carrots Step-By-Step in the Garden

- How To Grow Lavender From Seed

- How To Grow Green Beans Easily From Seed To Harvest
- How To Grow Bamboo From Seeds

- How To Grow Avocados From Seeds | A Comprehensive Step-By-Step Guide


good works
Thanks for the write up, it very educative.
Putting them into PDF will go a long way to help others.
I may need one if you have the PDF
Thanks
There’s no PDF at the moment, but I will consider it.
thanks. please can i get a company to buy my tomatoes in bulk. Am in ghana.
Anyone who can supply tomatoes in bulk to you in Ghana may see this comment and reach out to you.
Thank you very much for the lesson. keep it up.
You are welcome.
How i wish we many Agric officers who can guide Tomato farmers like this. Job well done.
Thank you for your kind words.
Thank you very much for the lesson.
I will be a good tomato producer.
Awesome Elizabeth. I’m glad this tomato farming guide has spurred you to be a good tomato producer.
Nice 100%
I’m glad you learned how to grow tomatoes from this article.
Thanks for putting together Farming Information for Start ups like us
You’re welcome.
Fantastic
I’m glad you liked it.
Thanks for your update.
I love this
Thank you Derick.