What is Bumblefoot in Chickens and How Do You Treat Them?
The bumblefoot in chickens is a common occurrence, especially for chickens that roam around freely, scratching and perching.
At the beginning stage of this infection, it may seem like the birds can handle it.
However, the bumblefoot disease can slowly develop into a more serious issue affecting vital tissues in the body of the chicken.
Hence, the bumblefoot in chickens is something you should not play down on.
In this article, you will learn everything about the bumblefoot disease, its causes, treatment, and prevention techniques.
So, if you are ready to get the full information, let’s begin…
What is bumblefoot disease?
Bumblefoot is a common bacterial infection of poultry animals that affects the foot.
In poultry farming, bumblefoot is the name of the infection that affects mostly a bird’s footpad aside from the bones and joints.
Medical professionals often refer to it as “planter pododermatitis.”
Chickens can contract the bumblefoot disease when they constantly walk on rough and hard surfaces which would develop wounds and cuts on their feet.
A bumblefoot disease in chickens that you don’t treat can result in serious cases of infection as it can spread to other tissues and bones on the bird’s feet.
Most commonly, a staph infection is the cause of this bumblefoot disease in chickens.
The bacteria “staphylococcus” stays longer in a coop that is always messy.
What are the causes of bumblefoot disease in chickens?
Here are some of the factors that constitute bumblefoot disease in birds.
1. Rough surfaces or floor:
Birds standing too long on rough surfaces which consist of rough flooring material can cause bumblefoot disease in chickens.
Small cracks can form on the sole of their feet followed by red spots or sores which are characterized by bumblefoot disease.
2. Lack of activity:
A bird that resides in a spot for a long time can develop swellings and redness on the foot which can result in this disease.
3. Overgrown toenails:
If a chicken’s toenails overgrow, the edges of the nails can bend over piercing through the skin paving way for the disease.
4. Previous leg or foot injury:
An injury that was not treated effectively can bring about the infestation of this disease.
5. Vitamin A deficiency:
A chicken that lacks vitamins that could have kept them energized at all times can develop bumblefoot disease as it has developed weak legs.
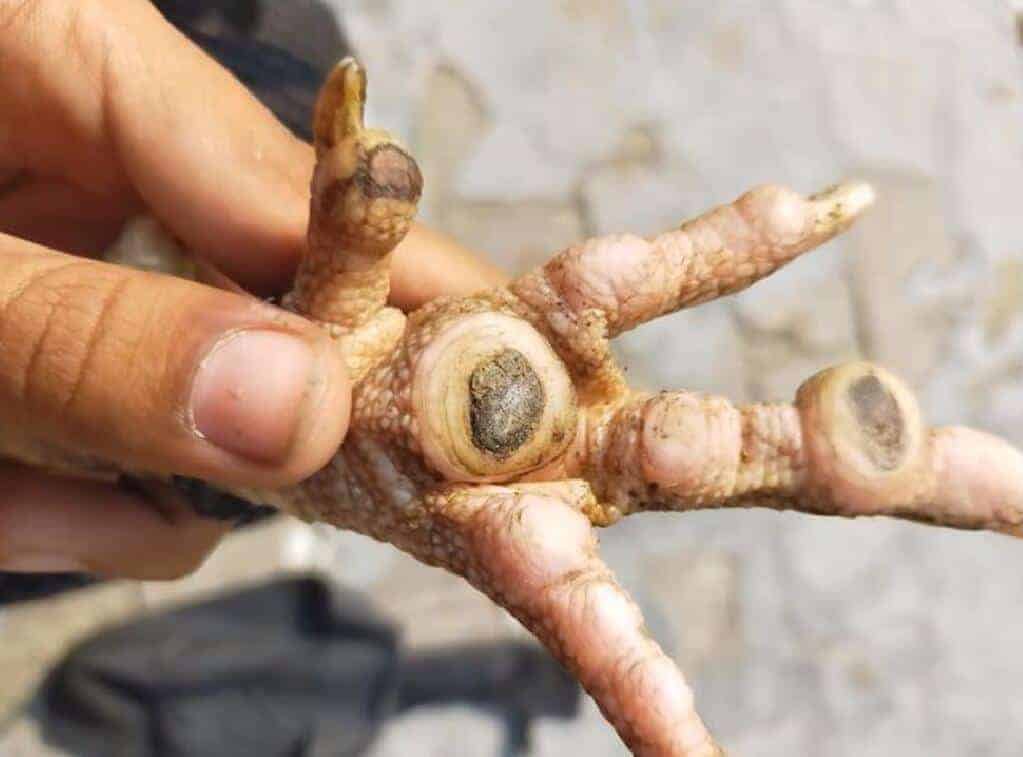
How can I determine and identify bumblefoot disease in my flock?
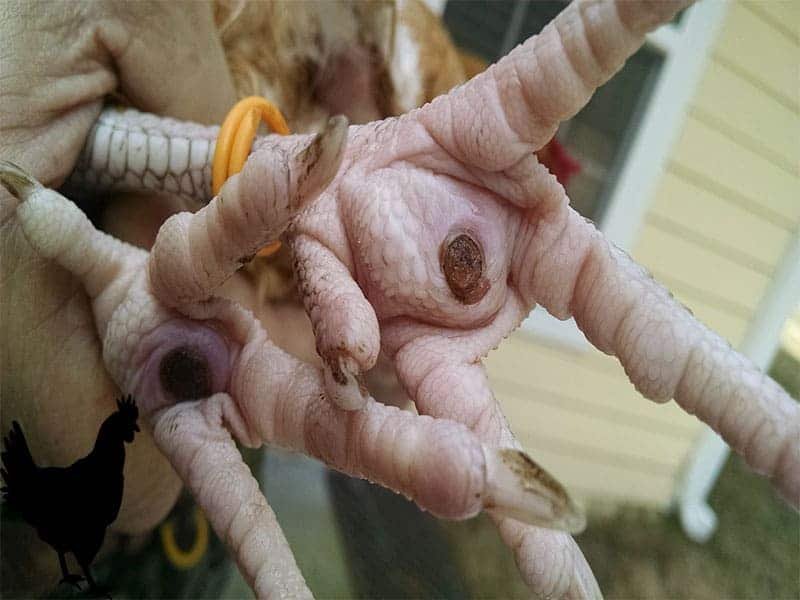
The first thing you have to do to know if your bird has bumblefoot disease is to, of course, regularly check the chicken’s foot.
Bumblefoot may present redness, small red sores, and swellings on the pad of the foot or feet.
In addition, place your bird’s feet on an x-ray machine (a machine used to detect an internal injury) to know if there is further damage to the bones and joints.
You can as well take a blood sample to check for other possible health conditions.
What are the symptoms of bumblefoot?
There are many foot issues that chickens can suffer from, and each one has a unique course of treatment.
It is important to correctly identify what the foot issue is all about before medical action is taken.
Here are some initial symptoms that point to bumblefoot being the source of foot pain in your chicken.
- Scabs on feet
- Redness
- Swelling
- Lameness
- Reluctance to walk
- Thickening of skin
- Rough red skin in between the toenails
You will need to carefully inspect your chicken for bumblefoot.
Remember, bumblefoot comes with pain, so be careful while inspecting the chicken’s feet.
How can I prevent this disease from affecting my flock?
Bumblefoot is easily prevented, it only requires dedication and care.
Preventing bumblefoot infection is the best possible way of keeping your flock healthy at all times.
The following are some of the activities that will help to prevent bumblefoot diseases on your farm.
1. Inspect your flock regularly:
Always inspect your flock’s foot to detect infection at the earliest possible stage.
A disease that is caught early gives better chances for prevention and elimination.
2. Give your chickens a balanced diet:
A balanced diet is essential for ensuring that your chickens maintain their health as the nutrients they digest contribute to the development of their bones and skin.
Also, maintaining a healthy diet will keep your chicken lean so as to prevent health complications from having overweight.
For more information about the diet of chickens, learn about what chickens eat and also how to make the best organic chicken feed for your farm
3. Maintain a clean chicken coop and environment:
By cleaning the coop regularly you tend to reduce the spread of this infection by eliminating the growth of bacteria.
Though it is almost impossible to keep the coop clean at all times, there are some measures you can take to keep an optimum level of cleanliness.
For example, your chicken coop should be kept clean of faeces.
The more the faeces stay longer in the coop, the higher the risk of bacteria growth which happens when the chicken steps its feet on the faeces.
Besides causing bumblefoot disease, a dirty chicken coop can be a reason for high chicken mortality on your farm.
4. Avoid setting up chicken perches or roosts high up:
Having the roost high up in the coop poses a threat to the chickens well being.
Bumblefoot is caused by recurring force and excess pressure on the feet.
As a result, activities like jumping down from a roost that is too high place your chicken at a higher risk of a foot injury which can get infected by bumblefoot.
5. Regular exercise:
If a chicken carries excess weight, it increases the pressure and strain placed on the feet.
When the feet have to work harder to support additional body weight, your chicken becomes a high-risk candidate for bruising and swellings.
So, ensure that you allow your chickens to roam around and graze.
Doing this will allow the chickens to exercise their body and burn off excess weight.
This practice may not be possible for those who use the battery cage system of poultry housing.
However, those who run the free-range or deep litter housing system can conveniently allow their chickens to roam freely.
How do I treat the bumblefoot disease in chickens?
The best treatment for this is by catching it early, so you have a high chance of healing it.
Once found you can use the best treatment for it.
Check out these recommendations…
1. Dress the bird’s wound when you see it:
Dressing the bird’s feet and also sanitizing them helps to reduce the opportunity for pathogens to enter the wound.
2. Provide antibiotics to the chicken:
An antibiotic ointment or medication will help in solving infections.
Thus, the birds can be kept comfortably even while undergoing anti-inflammatory medication.
3. Clean all surfaces and remove all sharp objects in the surrounding:
Birds would always be birds.
In as much as the birds are still undergoing treatment, they would still want to roam around.
So, removing destructive substances from where the birds would perch helps to improve healing in the birds.
4. Remove the wounds on the chicken:
Removing wounds from the flock’s feet and applying “vetericyn” 2-3 times daily helps improve healing.
This can be done surgically.
What happens if I don’t treat bumblefoot?
Bumblefoot disease may not be as deadly as other chicken diseases such as coccidiosis, fowl pox, or Marek’s disease.
However, they can be fatal to chickens as the infection can spread to their bones and tissues.
Bumblefoot is an infection, if it is not treated, there is a very good chance it will get progressively worse causing some extreme pain and swellings.
If not taken care of properly, there are chances that your chicken may never walk normally again.
How do I carry out a bumblefoot surgery on my flock?
Before carrying out surgery on a chicken remember that it can also feel pains just like you, though it may appear to tolerate the procedure well.
However, chickens do not express the pain in ways we might expect like crying, wincing, whimpering, etc.
While the bird may remain calm throughout the procedure, it is thought that calmness serves as a defense mechanism for self-preservation in the wild so as to not attract attention from predators.
The bumblefoot removal procedure is indeed painful for chickens, so be careful not to inflict more pain on your flock.
So, to carry out the surgical process of removing bumblefoot from a chicken, here are the steps to follow…
Step 1: Provide the necessary equipment and prepare:
The supplies and equipment you need include several large towels, gloves, vetrap, scalpel or biopsy, punch, paper towels, chlorhexidine 2% solution spray, vetericyn spray or triple antibiotic ointment, and non-stick gauze.
All of the supplies are available online, some are commonly found in drugstores or supermarkets.
Infection control is the most important aspect at every stage of this procedure.
The sink is sanitized with a chlorhexidine 2% solution spray or bleach and water solution.
Gloves are worn to protect the birds and operators, as staph infection can be contracted by humans.
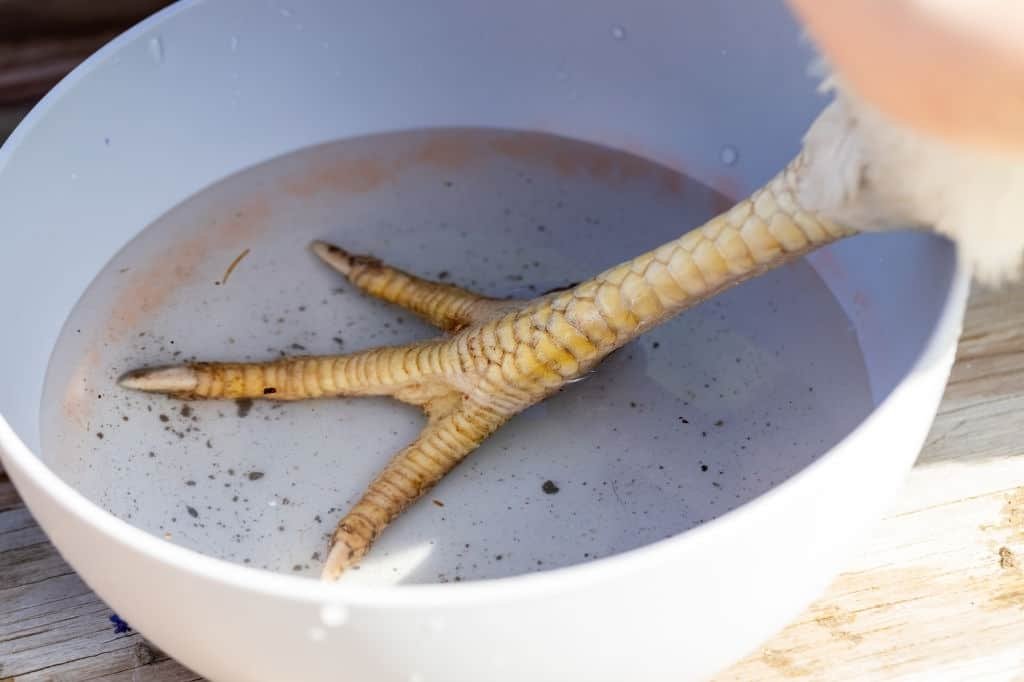
Step 2: Soak the chicken’s feet in warm water:
Soak the affected feet in warm water with Epsom salt or warm water with betadine.
After that, scrub the feet for general cleaning and to soften up the foot tissue.
The next activity is to spray the Chlorhexidine 2% solution to kill the remaining bacteria on the surface of the foot.
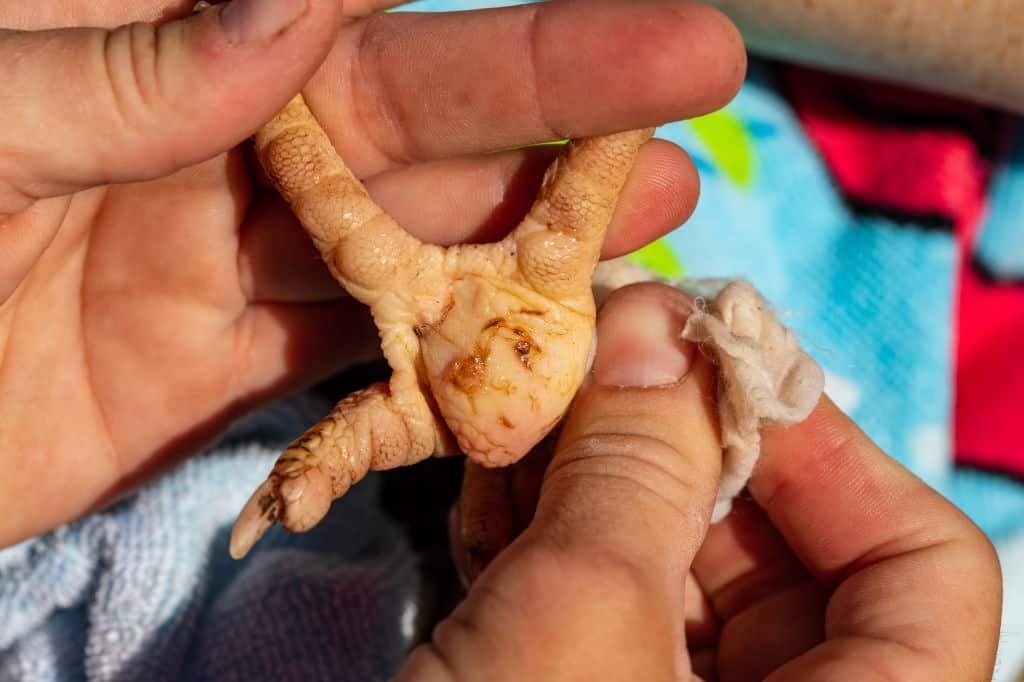
Step 3: Clean and wrap the bird carefully:
Clean the bird’s foot and wrap it very loosely in a towel covering its head and eyes and ensure an open breathing room.
This keeps the bird in place, not moving.
The bird is then laid on the work surface on its back, with the affected foot facing the operator.
Vetericyn is again applied to the foot.
Some oozing blood is expected, but not a bad amount.
Dapping the blood with a paper towel helps create a clearer view of the work area.
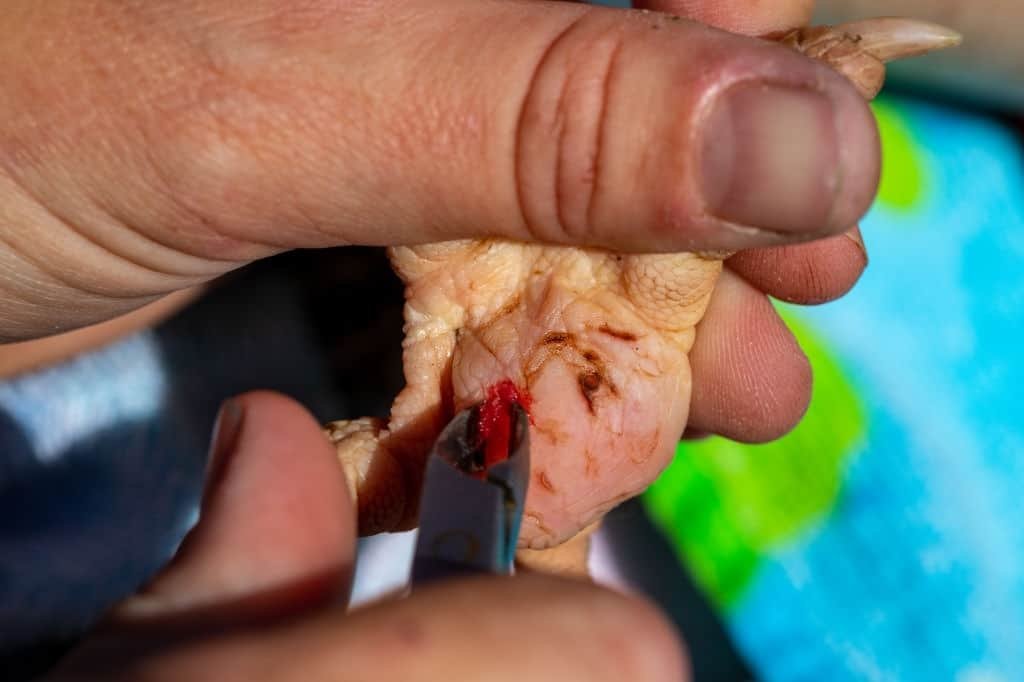
Step 4: Cut off the dead tissue in the foot:
The aim is to locate the heart of the dead tissue, which is commonly referred to as the “kernel”, “core” or “plug”.
The core consists of dehydrated pus that has become solid. It often looks like a waxy, dried kernel of corn.
Using a scalpel or biopsy punch, the footpad is cut off round and round the wound, straight down into the foot.
If using the scalpel, the task can be a bit complicated as living tissue is taken away from the wound bit by bit.
A better recommendation would be to use a biopsy punch for this process.
Step 5: Finishing and bandaging:
After the kernel must have been located and removed, the foot is again soaked in a sanitized sink containing chlorhexidine or betadine solution.
The footpad is gently squeezed and massaged to loosen any remaining dead tissue.
When that is done, the foot is dried up while applying vetericyn again to the wounded area.
And then the process continues as it takes a lot of digging, squeezing, and soaking to remove all affected tissue.
Using a chlorhexidine spray, sanitize the wound one last time then apply a triple antibiotic ointment to the open wound.
A 2×2 square of non-stick gauze is placed over the wound, the corners of the gauze are then folded inwards, towards the center of the square creating a smaller square that attracts a little pressure to the area to reduces the bleeding or oozing and keeps the antibiotic ointment in place.
The gauze is kept in place using a vetrap, a self-adhesive bandaging material.
It is important not to pull the vetrap too tightly as it can cut off the circulation of blood in the foot.
It is important to take a break or so before returning to the job as it can be taxing mentally and emotionally.
The vetrap remains in place for like 2 days before it is removed and the wound accessed.
If the gauze happens to stick to the wound, soaking the foot in warm water helps to loosen it.
Seeing a little oozing after the bandage is removed is expected, so having a vetrap close by will help keep the area clean and dry.
What happens after a bumblefoot surgery?
Healing is expected to be the following up after surgery.
The wound will still look a bit swollen with the bandages still on it.
The bandage is then taken off carefully, this should happen three days after the surgery. A new scab is expected to form.
Examine the wound for any redness, swelling, foul odor, red streaks up the foot and leg, or excessive oozing that may indicate a secondary infection that would require treatment with antibiotics.
If the foot appears to be healing well, re-bandage the wound using the same procedure of placing the bandage around and between the feet.
The bandage remains on the foot for a week to 10 days, and you change it every 48 hours. By doing his, a newly improved scab will form, healthier than the last.
How long does it take for a bumblefoot to heal?
A bumblefoot disease that is caught early has better chances of healing well within 3-4 weeks time intervals.
The ones that are discovered rather too late will take a longer time to heal well as the infection has spread to the bones and tissues in the chicken’s body.
You can start counting from a month to 3 months, but be rest assured, it will heal perfectly well if properly taken care of.
Conclusion
If you care so much about your chickens, then you will not want them to suffer from any form of chicken disease.
Hence, the best way to ensure your birds are always healthy is to completely prevent things that can lead to infections.
The cause of bumblefoot disease is pretty simple – a mere cut or injury in the leg.
Though the injury may be insignificant in the beginning, do not ignore it as it can go on to damage the vital tissues of the chicken.
By following the steps in this article, you will be able to prevent the bumblefoot disease from affecting your birds.
Also, you can follow the steps of carrying out surgery to remove the dead tissue from the chicken feet.
Above all, prevention is always better than cure.
So, I urge you to always observe your birds for signs and symptoms of bumblefoot disease so that you can help them immediately.
Cheers.
References:
- 12 Best Chicken breeds for Eggs – chicken breeds for eggs
- When Do Chickens Start Laying Eggs Regularly?
- How Many Eggs Does A Chicken Lay In A Week?

- Fermenting chicken feed – The definitive guide
- 10 Sure Ways To Stop Chickens from Eating Their Eggs [+Bonus]
- 6 Best Chicken Egg Incubators for Chicken Eggs and Other Birds