Mushroom farming: How to grow edible oyster mushrooms step by step

If you are looking for a profitable agribusiness that is easy to start, then consider Oyster mushroom farming.
Oyster mushroom farming is a goldmine because it requires very little startup capital.
Also, you only need to wait a few weeks to start making huge profits from this business.
The necessary materials for starting up are easily accessible and there is a huge demand for mushrooms.
Did you know that you can grow mushrooms using an empty room in your house?
Now, you are beginning to see how easy it is to start mushroom farming.
If you want to learn more about oyster mushroom farming, then continue reading this guide until the end.
Oh!! At the end of this article, I’ve added a comprehensive video that explains the steps in mushroom farming.
Enjoy!
What is mushroom farming?
You can refer to mushroom farming as a type of farming known as Mycology, Mushroomology, or Fungiculture.
All of the words above mean that mushroom farming is the practice of growing fungi called mushrooms.
Mushroom farming is not the planting and growing of crops.
Instead, it is the growing of fungus to produce mushrooms.
In the past, farmers mostly hand-picked this fungus in the wild.
However, modern-day farming practices (like the use of fertilizers) have hindered the natural growth of mushrooms.
Other causes of the disappearance of this excellent food source are the changes in weather, global warming, deforestation, etc.

What is the best mushroom to grow?
Currently, there are over 10,000 known types of mushrooms.
These are grouped as:
- Edible mushrooms,
- Medicinal, and
- Poisonous Mushrooms.
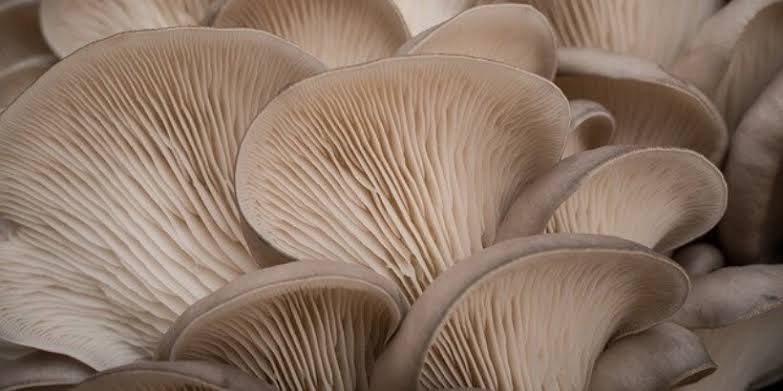
For this mushroom farming guide, we will focus more on the edible oyster mushroom.
The oyster mushroom is easy to grow and has a very high demand in the market.
What are the nutritional/health benefits of mushrooms?
Mushrooms have a lot of nutritional benefits that make them highly sought after.
It provides nutrients with anti-aging properties, and immune boosters, and helps to prevent cancer.
Here are some of the top health benefits of eating mushrooms;
1. They contain immune-supporting nutrients:
All types of edible mushrooms contain varying degrees of protein and fiber.
They also contain B vitamins as well as a powerful antioxidant called selenium, which helps to support the immune system and prevent damage to cells and tissues.
2. Source of vitamin D:
In particular, white button mushrooms are one of the few non-animal sources of vitamin D.
When they are grown, whether indoors or outdoors, they are exposed to UV light which increases their concentration of vitamin D.
3. May help protect against cancer:
Certain varieties of mushrooms have the potential to protect against cancer.
They do this by protecting our cells against DNA damage but also by inhibiting tumor formation.
There is also some evidence that they may be beneficial in the treatment and management of neurodegenerative diseases such as Alzheimer’s.
4. May help maintain heart health:
Mushrooms have been shown to have some therapeutic properties (like kratom shots) that can help to lower cholesterol.
This is evident, particularly in overweight adults.
Also, they produce phytonutrients that can help prevent cells from sticking to blood vessel walls and forming plaque build-up.
This in turn then helps protect the heart by maintaining healthy blood pressure and circulation.
What are the benefits of starting a mushroom farming business?
You may ask, “Why should I go into mushroom farming?”
Well, here are some valid reasons for you to do so.
1. The startup cost is very low:
You don’t need large farmland that is capital-intensive to start mushroom farming.
You can simply use an empty room in your house to grow mushrooms.
Other materials that you need are also very cheap to acquire.
Later in this article, you will see the cost analysis of producing mushrooms and the massive profits that follow.
2. The materials for starting up are readily available:
The major raw material you need for this mushroom farming production is sawdust.
Interestingly, sawdust is readily available in all wood mills.
Other materials too are easily accessible in the market.
3. Mushroom farms are easy to manage:
In mushroom farming, you don’t need to plow the land nor do you need to do any weeding or fertilizer application.
Your only job will be to spray water on the blocks using a knapsack and to harvest the mushrooms when they appear.
4. Mushrooms help in agricultural waste management:
Mushroom is a bio-converter that converts organic waste into useful food.
It makes use of organic wastes such as sawdust, grass, paper, leaves, and straws which are all biodegradable.
5. Mushrooms have a very fast growth rate:
After just six weeks of planting your mushrooms, you can start harvesting.
That is a lot faster than many crops that you can think of.
6. It is a good source of income:
Mushroom farming is a good source of income because mushroom products are highly valued all over the globe.
As a result, you can make money from selling to the local market as well as exporting for foreign exchange.
In Nigeria, the demand for mushrooms is about 1500 tons annually.
However, the production rate is currently just 300 tons per annum which shows great opportunities ahead.
(P. S.: Stop looking for white-collar jobs).
7. It has lots of nutritional values:
Mushrooms are very satisfying to eat.
They are rich in vitamins, fiber, and antioxidants which perform a lot of functions in the body.
How do I start a mushroom farm?
Now that you know the benefits of mushrooms and why you need to start mushroom farming, how will you start?
In this section, we will dwell on some of the common terms used in mushroom production.
This will help you as I walk you through each of the steps in mushroom farming.
Also, we will be looking at all the materials that you need to get started.
Let’s go!
What are the commonly used terms in mushroom farming?
1. Fumigation:
The process of killing pests and insects in your incubating room.
2. Composting:
The substrate in which the mushroom mycelium grows and on which it produces fruiting bodies.
It is the product of a fermentation process brought out by several mesophilic and thermophilic microorganisms that decompose plant residues and other organic and inorganic matter.
3. Mixing:
The process of mixing your sawdust, wheat bran, and calcium carbonate with water to form a substrate.
4. Substrate:
The surface or material on or from which organisms live, grow, or obtain their nourishment.
It is also the soil in which mushrooms grow.
5. Bagging:
The process of putting your substrate inside a bag before pasteurization.
6. Mushroom Blocks:
It is the outcome after mixing your substrate and bagging it into nylon bags.
These loaded bags are pasteurized or heated to form a solid called a BLOCK.
It is on this block that the mushrooms will germinate.
7. Pasteurization unit:
It is a place or space where the blocks are heated for at least 12 hours to kill germs, bacteria, and other microorganisms.
8. Spawns:
This is the seed or fungus that is planted to produce mushrooms.
9. Mycelium:
The body of a fungus, most of which is underground or hidden within the wood.
10. Sterilization:
Any process that removes, kills, or deactivates all forms of life (in particular referring to micro-organisms such as fungi, bacteria, spores, unicellular eukaryotic organisms such as Plasmodium, etc.)
11. Inoculation:
This means planting or cultivating your mushroom spawns into the blocks.
12. Ramification:
This is what happens when the spawns begin to germinate in the block.
The spawns will spread their roots in the block until the block turns white.
13. Ramified:
A mushroom block is said to be ramified when it has completely turned white.
14. Incubating room:
It is a dark room with less light and oxygen where the ramification process of the blocks is carried out.
This room is created by sealing every part of the room with a black plastic bag.
So this room is usually pitch black and you will require a torchlight to move around the room.
15. Fruiting/Cultivating room:
A cool room or space where the blocks are kept to start mushroom production.
16. Fruiting:
This refers to the process where the fully ramified blocks start producing mushrooms.
17. First-generation spawn:
It is the first time mushroom mycelium is transferred onto the grain.
18. First flush:
Defined as the very first plucking of a Mushroom during harvest season.
What are the recurrent raw materials needed for growing oyster mushrooms?
This refers to all the materials that you need to buy every time you want to produce oyster mushrooms.
In other words, they do not last very long.
Some of the recurrent materials for oyster mushroom production include;
- Saw dust (100kg)
- Wheat bran (5kg)
- Calcium carbonate (1kg)
- Water (10 liters)
- Ice block nylon
- Rubber bands
- Mucus spirit
- PVC pipes
- Bleach
- Fumigant (for disinfecting the building)
- Cotton wool
- Disposable gloves
- Nose mask
- Gas
What are the fixed assets for mushroom production?
- The building
- Fruiting room
- Incubating room
- Production room
- Drums
- Gas cylinder
- Gas burner
- Shovel
- Shelves or ropes
- Knapsack
- Labor
- Large black nylons
- Table and chairs (optional)
- Hook-scale
- Digital table scale
- Razor blades
- Synthetic Ropes
With all of these materials ready, we are set to start producing oyster mushrooms.

How to grow mushrooms step by step
In this section, we will dwell on the step-by-step process of how you can start producing mushrooms.
From the fixed materials we need for mushroom production, you would have noticed that what we need is a room.
That is because mushroom farming is mostly practiced in an enclosed space, unlike other agricultural farming.
Also, the presence of bleach and fumigant is because the process of growing mushrooms requires good hygiene practices.
Therefore, the bleach and fumigant help to eliminate contamination and other parasites or micro-organisms that will affect production.
Generally, the steps in oyster mushroom production include Composting ➡️ Spawning ➡️ Casing ➡️ Spinning ➡️ Cropping.
But let’s break all of these activities down into steps
Step 1: Prepare your incubating room:
Just as you do land preparation for growing crops like cassava and maize, you will also have to do the same thing for mushrooms.
Only in mushroom farming, do you need to fumigate and sterilize the incubating room.
This process is necessary because mushroom production requires the highest level of sanitation and hygiene.
If there is even the slightest contamination in your mushroom farm, it may cause your mushrooms not to produce.
Even after sterilizing this room, you don’t just go inside and out at any time.
Everyone and every single piece of equipment that will go into the incubating room must be sterilized too.
So, if you go out and come inside the incubating room 10 times, then you will have to sterilize yourself 10 times.
It is that serious.
Step 2: Scale the number of ingredients that you need:
In this step, you will use the digital scale and the hook scale to measure the number of ingredients that you need.
The ingredients to measure are sawdust, wheat offal, and calcium carbonate.
Use the hook scale to measure 100kg of sawdust and 5kg of Wheat offal.
We are using the hook scale here because it is best for scaling heavyweights.
As for the calcium carbonate, use the digital scale to measure only 1kg.
Depending on the dampness of the sawdust, 10 liters of water should be enough to bring it to the right texture.
Step 3: Screen the sawdust to remove unwanted debris:
After measuring the sawdust, pour it on a clean surface and screen it properly to remove all foreign objects in it.
You can do this on a clean cemented floor.
Use your hand or shovel to turn the sawdust gradually to remove stones, wood, nylon, and other unwanted objects.
Step 4: Mix the ingredients:
Here, you are going to mix the sawdust, wheat offal, and calcium carbonate.
Start by spreading the 100kg sawdust on the cemented floor using a shovel to increase the surface area.
After that, spread the 5kg wheat offal and 1kg calcium carbonate all over the sawdust and mix thoroughly.
Use the shovel to turn the mixture thoroughly until you are sure that the mixture is consistent.
The next thing is to add water slowly, mix it with your hands, and test whether it is well moistened.
To test whether the water is perfect, hold some of the mixtures in your hand and squeeze tight.
The mixture in your hand should be compacted together and take the shape of the squeeze.
If it does not hold together or breaks easily, add more water slowly and mix.
On the other hand, if it drips water, then the water content is too much.
Make sure it never gets to this point.
Step 5: Bag the substrates, scale, and seal the nylon:
After getting the right moisture content in your substrate, it is time to load it into small bags.
First, tie the bottom/sealed part of the ice block nylon bag and then turn it inside out.
The essence of doing this is to ensure that substrate fills every corner of the bag.
Now, put some substrate into the bag with your hand.
Hiya the bottom gently on the floor and press down with your hand to ensure that there are no air gaps.
After that weigh the bag with the substrate using the digital scale to get a 1kg measurement.
Repeat this process until you exhaust the entire substrate on the floor.
Step 6: Treat the blocks with heat (Pasteurization):
After bagging the substrates inside the nylon bags, the result is what we call Mushroom Blocks.
These blocks need to be treated to kill all germs and microorganisms inside of them.
And the best way of treating the blocks is through a process called pasteurization.
This is simply the same thing as heating the blocks consistently for a very long time, usually 12 hours.
To do this, place your metallic drum over the gas burner and add enough water to it.
After that, throw in some huge wood trunks or stones until the water becomes invisible.
This is to ensure that the water in the drum does not come in contact with the blocks.
We only need the steam from the boiling water in the drum to pasteurize the blocks.
Once everything is set, stack the mushroom blocks on the stones/wood trunks to fill the drum.
Now, use a black plastic bag to cover the drum properly to ensure that the steam does not escape and the heat is retained.
Turn on your gas and allow the setup to heat up for 12 hours.
You can use time in this step for accuracy.
After 12 hours, turn off the gas and then leave them set up like that to cool for 24 hours.
Step 7: Inoculation in the incubating room:
This is the most important step in the mushroom production process.
Any mistake that you make at this point will cost you a lot.
Therefore, you have to be careful to make sure that you don’t bring any contamination into the incubating room.
You must sterilize each of the blocks one by one as you take them out of the drum.
Use a white handkerchief dipped in hypochlorite solution to wipe the body of each block.
Also, before you enter the incubating room, you must sterilize yourself by washing your hands and feet in a bowl of hypochlorite (bleach) solution.
You also need to wear a face mask (to prevent your spit from touching anything) and surgical hand gloves.
Use a sterilized spoon to break the spawns apart into a sterilized bowl.
To inoculate a block, sterilize your hand by spraying some bleach solution on your palm.
After that, use a sterilized spoon to spread some spawns inside the blocks especially, around the edges of the bag.
Make sure that the spawns are touching each other and form a complete ring around the edges of the block.
Pass the open part of the bag through a PVC pipe and press downwards to leave a small opening the size of the PVC pipe.
Use a rubber band to hold this arrangement in place and then use cotton wool to close the small opening.
The essence of cotton wool is to prevent contaminants from getting into the block.
After you are done with the block, set it aside in one corner of the incubating room.
Repeat this process for all the blocks.
Step 8: Wait for Ramification to take place:
The blocks in the incubating room should be arranged in such a way that you can easily walk around and sort them.
After arranging all the blocks in the incubating room, lock the room for two weeks for ramification to take place.
After two weeks, come back and check the blocks for ramification and contamination.
Remember that you must sterilize yourself before entering the incubating room to check.
Also, you must wear a nose mask and sterilized surgical hand gloves.
A block that is ramified should be white while the ones that are not will be in the same state.
To identify a contaminated block, it will have a greenish color.
So, your job is to remove such blocks immediately and leave the rest to ramify.
Also, some blocks may look blackish and that is because the temperature of the incubating room is too hot.
So, you need to improve the temperature.
Putting thatch on the roof can greatly reduce the effect of heat from sunlight.
Normally, it takes 3 to 4 weeks for the mushroom blocks to be fully ramified but the temperature has a huge role to play.
The ideal temperature for mushrooms is between 25 to 27 degrees Celsius.
That is why mushrooms do better during the rainy season and when the weather is cold.
Mushrooms can also be cultivated during the dry season as long as you can control the temperature to not exceed 30 degrees Celsius.
Step 9: Hang the ramified blocks in the fruiting room:
After about 4 weeks of ramification in the incubating room, it’s time to bring the ramified block into the fruiting room.
Unlike the incubating room, the fruiting room allows light and oxygen to get in.
But before we bring the blocks out, we still need to sterilize the fruiting room.
This is where our knapsack will come in handy.
Mix a hypochlorite (bleach) solution poured into the knapsack.
Then spray the solution generously everywhere in the fruit room including the roof.
Don’t try to minimize how much of the solution you spray in a single spot.
Make sure that you spray on a single spot until the solution starts dripping to the floor.
After thorough sterilization, bring the ramified blocks out for tying.
The method of tying the blocks is best explained practically in a video.
But the aim is to tie the blocks vertically from the bottom up towards the roof.
After tying, the cotton wool closing the small opening at the top of the block is removed and the excess nylon is cut off.
This is done so that it will be easy to wet the block properly.
This brings us to the next step.
Step 10: Wet the blocks every day:
After tying the blocks, wetting the blocks will be your daily job until the block exhausts its usefulness.
You have to get the blocks first thing in the morning.
If the weather is hot, like in the dry season, you need to wet the blocks at least 3 times a day.
To wet the blocks, fill a knapsack with clean water and spray on the blocks.
Make sure to spray the water all over the blocks for proper wetting.
Step 11: Fruiting, Harvesting, Scaling, Drying, and Bagging:
This is the last step in this mushroom farming process.
Once the mushroom block starts fruiting, you need to harvest it every 3-5 days.
A mushroom block takes about 6 weeks before it starts fruiting and after the 6th week, it will continue to fruit for up to 6 months.
To harvest the mushrooms from the block, just twist it to break it from its roots.
You can decide to scale the mushrooms and sell them fresh.
But be sure to sell off all fresh mushrooms immediately because mushrooms have a very short shelf-life.
There are different methods of preserving oyster mushrooms including; freezing, powdering, turning them into ketchup, tinctures, or pickling.
When refrigerated or cooked, mushrooms can stay up to 10 days.
But the best way to preserve mushrooms is by drying them.
Dried mushrooms have a shelf-life of up to one year.
After drying the mushrooms, you can store them in bags.

Step 12: Marketing of mushrooms:
Marketing is one of the hardest steps in the mushroom farming process.
It is more difficult especially when you stay in an area where people do not know the value of mushrooms.
The reason for this is the short lifespan of mushrooms.
If you don’t sell off immediately, you will lose your mushrooms.
But there is a solution…
Get mushroom farming training from us and we will buy all your mushrooms.
We have a very huge demand for mushrooms to meet the demand of all our clients.
Also, we are presently producing Mushroom Spices with all the mushrooms that we produce.
In the future, we will also start producing more products like mushroom ketchup, mushroom chutney, and mushroom pickles.
For the reasons above we need to produce more mushrooms and be consistent to meet all the demands.
That is why we seek entrepreneurs with whom we will train and partner to meet our unlimited market demands.
How does this work?
- First, click on the button below to show your interest via WhatsApp.
- We will get your details and invite you for training.
- After the training, you will get two bottles of spawn to practice at home.
- You will go back home, set up your farm, and start producing mushrooms. If you need help, we can also help you to set up your farm at a cost.
- You will have access to us throughout the process for proper guidance.
- When your mushrooms start fruiting, we will buy back everything your farm produces.
This opportunity is only for those who are in Nigeria.
Also, you must be ready to start producing immediately after the training.
We don’t want to waste time and energy.
So, if you are not ready, please DO NOT send any messages to us.
If you are ready to start immediately, then click on the button below to send us a message on WhatsApp.
How profitable is mushroom farming in Nigeria?
The best way to find out how profitable this business is, let’s do a financial analysis of oyster mushroom production using 100kg of sawdust.
Here, I will explain how much you will spend and how much profit you will make producing mushrooms.
Usually, 100kg of sawdust will produce 180 blocks weighing 1kg each after mixing.
What is the cost of starting a mushroom farm?
The cost of materials needed for this project are as follows;
- 100kg of Saw Dust – 2,000 Naira (not fixed)
- 5kg of Wheat Offal – 250 naira
- Calcium carbonate – 50 naira
- Gas – 5,000 naira
- Sterilization/fumigation which includes;
– 1 bottle of 500mls hypo bleach – 600 naira
– 2 bottles of mucus spirit (600 x 2) – 1200 naira
– Cotton wool – 400 naira
Other materials:
- 2 PVC pipes – 800 naira
- Rubber bands – 200 naira
- Ice block nylon – 200 pieces for 1500 naira
- Workmanship – 3000 naira
- Nose mask and gloves – 1000 naira
- Spawns (36 bottles) – 36,000 naira
The total cost of production is 52,000 naira.
How much can you make from 180 mushroom blocks?
Each mushroom block is expected to produce a minimum of 1.5kg of fresh mushrooms.
However, we will do our calculations with 1kg per block and an 80% success rate.
1kg of mushroom sells at a minimum price of 1500 naira/kg (ranging between 1500 naira/kg to 3000 naira/kg.
1500 naira by 180kg = N270,000.
That is if you are wetting the blocks by yourself every day without paying for labor.
The cost of labor is not fixed.
Let’s say you pay 10,000 naira per month for wetting;
6 months by 10,000 naira = 60,000 naira
The total profit for 180 blocks of mushrooms is (270,000 – 52,000 – 60,000) naira = 158,000 naira.
At an 80% success rate, we have;
80% of 158,000 naira = 126,400 naira profit
The 80% success rate is fixed; it could be between 90% to 95% or lower depending on your training and expertise.
Most of the raw materials mentioned are reusable (like PVC pipes, rubber bands, and nose masks).
What are the challenges in mushroom farming?
The greatest challenge in the mushroom business is sustainability in sales.
Other challenges include the effect of weather, contamination, short shelf-life, and ignorance of the health and economic benefits.
What are the solutions to the problems of mushroom farming?
To solve some of the problems of mushroom farming, some actions must be taken.
Here are a few tips that may help.
1. Form cooperatives for mushroom farmers:
This will help in accessing loans, sharing market information, meeting market demands, having a stable price, etc.
2. Use cooling systems to control temperature:
Mushroom farming is not rocket science like every other greenhouse farming.
Therefore, to curb the effect of weather, you can regulate the temperature manually and systematically with the aid of a cooling system.
3. Adequate training for mushroom farmers:
Contamination can be reduced through training, good hygiene, and locating your mushroom farm in a less polluted environment, free of rodents.
After every production, pest control, proper fumigation, and sterilization should be done.
4. Site the farm close to the market:
The short lifespan of this fungus can be aided by locating your farm close to the marketplace.
Also, proper marketing and networking are very necessary for finding new markets.
In addition, you could dry the mushrooms or produce other mushroom products like seasoning, ketchup, pickles, chutney, etc.
5. Carrying out networking campaigns:
Networking is one of the most important offline marketing strategies that boost mushroom sales.
You can make a mushroom recipe booklet and share it with people.
Samples of your products can be distributed in big malls and a variety of stores.
Awareness can also be created through outdoor publicity such as wall hoardings, banners, social media advertisements, influencer and affiliate marketing, insertions in newspapers, etc.
What business can you make out of mushroom farming?
There are different businesses that you can start from mushroom farming.
Here are some of them;
- Production and sales of spawns.
- Production and sales of mushroom blocks.
- Fruiting and sales of mushrooms.
- Brokerage of Mushrooms
- Duplication of Spawns
- Production and sales of mushroom products like spices, ketchup, and pickles.
Conclusion
I firmly believe that this mushroom training guide is as detailed as possible.
Let’s get our hands dirty because this is a great step toward financial sustainability.
Mushroom entrepreneurship is a proven sustainable business that gives up to 40% ROI in the first cycle.
You can even get more than 80% ROI in the 2nd cycle.
Just like that, the return on investment keeps increasing over time.
Mushrooms can be consumed in so many interesting and exciting ways which include; frying, grilling, soup and stew preparation, pizza, sandwich, burger, etc.
It is also used to produce ketchup, seasonings, spices, e. t. c.
If you start mushroom farming today, you are well on your way to financial freedom.
Share this article with everyone you know so that they can share this opportunity.
Cheers.
References:
Practical mushroom farming video guide
- 12 Best Chicken breeds for Eggs – chicken breeds for eggs
- When Do Chickens Start Laying Eggs Regularly?
- How Many Eggs Does A Chicken Lay In A Week?

- Fermenting chicken feed – The definitive guide
- 10 Sure Ways To Stop Chickens from Eating Their Eggs [+Bonus]

- 6 Best Chicken Egg Incubators for Chicken Eggs and Other Birds


Wow! The article is so detailed and empowering.
Thanks!
God bless!
You are welcome, Josephine.
This post provides clear and detailed step by step activities in the production of mushroom. Your ideas are great and good enough to encourage people to venture into this farming. Please keep up the good work of information and education.
Thank you Bilqis for your kind words.